
Google Spreadsheets are great for collaborative number crunching. Much like Microsoft Excel, Google Spreadsheets allow you to produce financial models, analyze numerical data, keep track of accounts, etc. But what if you want to produce and deliver documents of a different nature, like letters to various recipients, based on the data contained in a Google Spreadsheet? Instead of going through each row of the spreadsheet one at a time and plugging data into a document template manually, you can use WebMerge to pull data from the spreadsheet and automatically fill in a template document, perhaps, to be delivered in PDF form to certain recipients!
"How can I do this?" you might ask. Don't worry! We’ll walk through the process in the tutorial below.
First, we’ll need to have a document ready for merging on WebMerge. In this example, let’s say we want to send students a report card based on data we have in a Google Spreadsheet. In the spreadsheet we have the students’ names, their email addresses, and their GPAs.
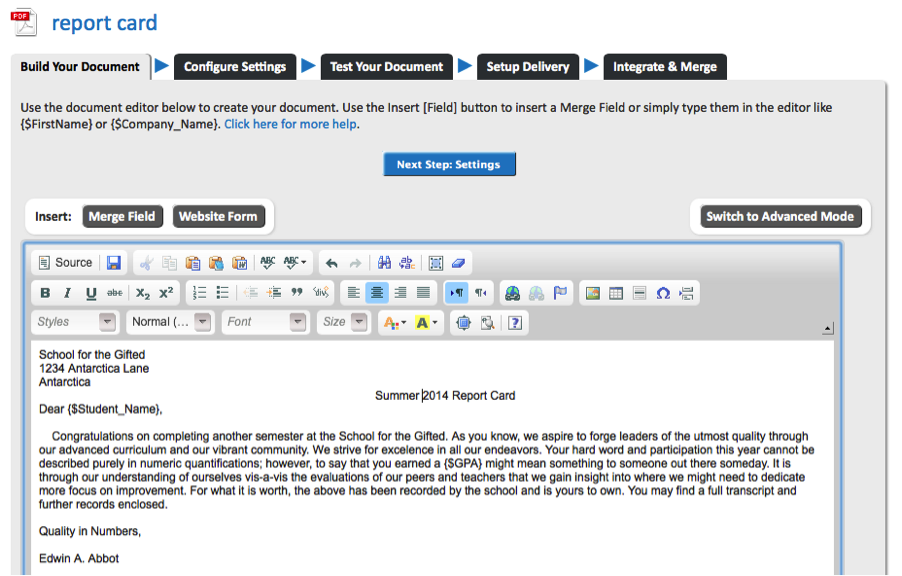
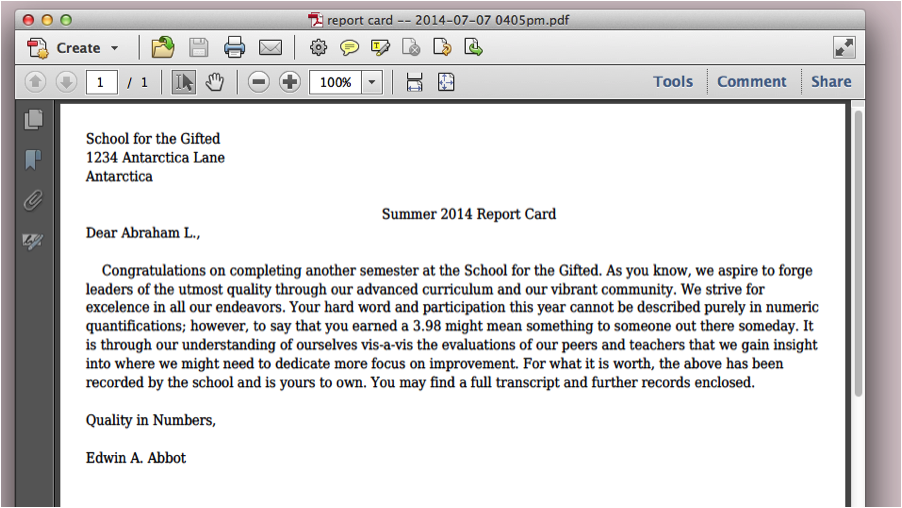
We first go to WebMerge and upload or create a new document in the Document Builder. The document we are about to upload or create is the document that will be automatically populated with the data from our Google Spreadsheet. Our merge document might look something like the following. The following is an example of a cover letter with merge-fields for the students’ names and the students’ GPAs. The merge fields will get populated with the data in our spreadsheet.
After we have our document template on WebMerge, we want to: make sure our configuration settings are how we want them, test our document, and set up delivery. Notice that in the delivery setup, we specify an <<other>> merge field. We didn’t create a merge field for the students’ email addresses, but we want to use the email address column in our spreadsheet to specify our email recipients.
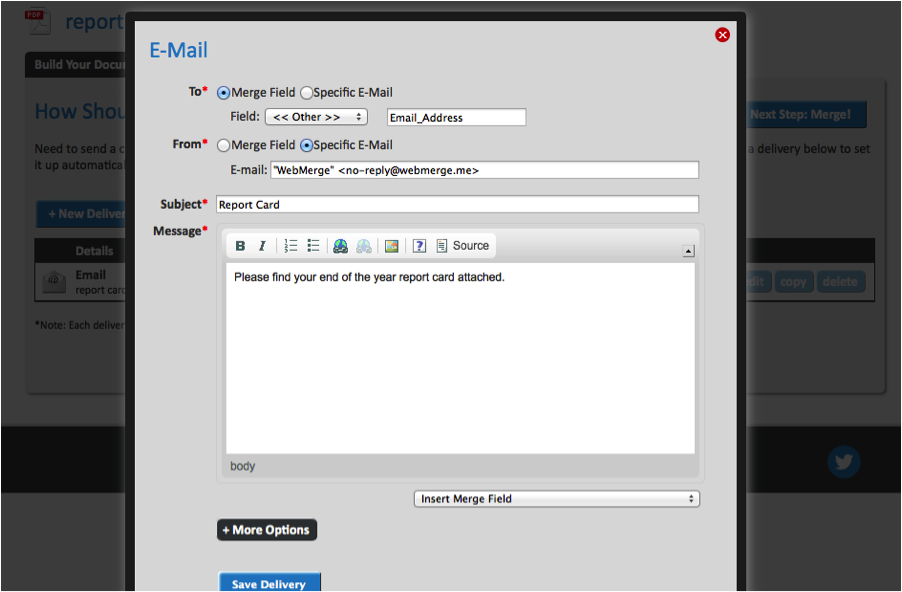
The above shows that we want to send the document to recipients according to a merge field that wasn’t in our document and has as yet to be specified. We want to send emails to the addresses in the email address column of our spreadsheet, so we specify that we want to create a new merge field called Email_Address and use it as a placeholder for the email addresses in our spreadsheet. In the next step we will match this placeholder as well as the placeholders in our document with the data we get from a CSV version of our spreadsheet.
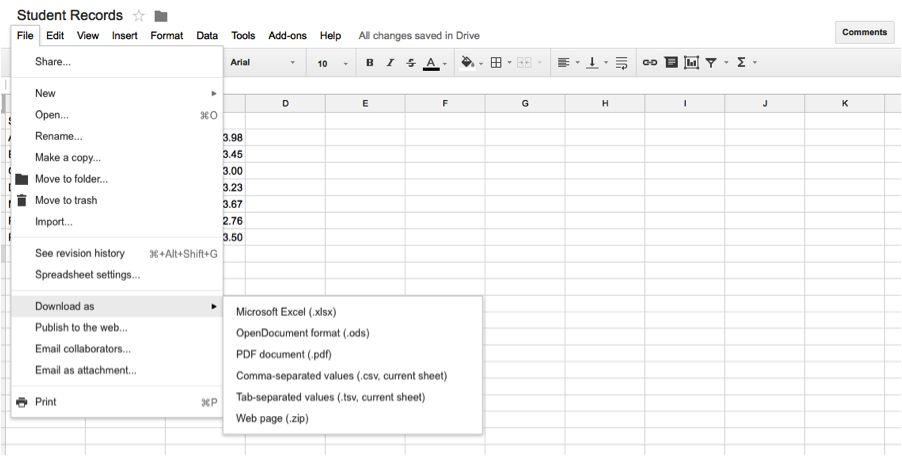
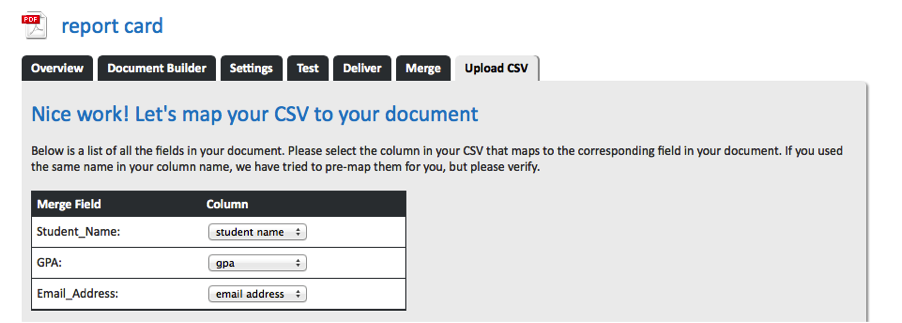
Now that we have made our document template and have saved our delivery method, we need to pull the information from our Google Spreadsheet. The easiest way to do this is to simply download the spreadsheet as a CSV file.
Once we have downloaded our data as a CSV file, we can upload that to WebMerge.
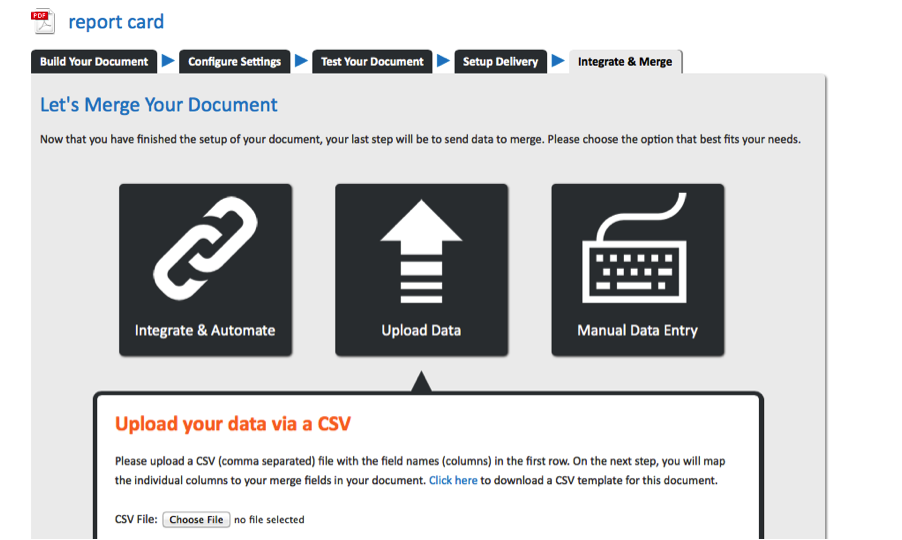
Upload the data, then in our final two steps we map the merge fields to the columns of our spreadsheet and send our newly created documents off to our recipients.
Click Merge the Data!

Congrats! You just merged your Google Spreadsheet data with a document template and sent it to all the relevant recipients.
Want to do more with WebMerge? Check out all the ways you can streamline your documentation process today!
"How can I do this?" you might ask. Don't worry! We’ll walk through the process in the tutorial below.
First, we’ll need to have a document ready for merging on WebMerge. In this example, let’s say we want to send students a report card based on data we have in a Google Spreadsheet. In the spreadsheet we have the students’ names, their email addresses, and their GPAs.
We first go to WebMerge and upload or create a new document in the Document Builder. The document we are about to upload or create is the document that will be automatically populated with the data from our Google Spreadsheet. Our merge document might look something like the following. The following is an example of a cover letter with merge-fields for the students’ names and the students’ GPAs. The merge fields will get populated with the data in our spreadsheet.
After we have our document template on WebMerge, we want to: make sure our configuration settings are how we want them, test our document, and set up delivery. Notice that in the delivery setup, we specify an <<other>> merge field. We didn’t create a merge field for the students’ email addresses, but we want to use the email address column in our spreadsheet to specify our email recipients.
The above shows that we want to send the document to recipients according to a merge field that wasn’t in our document and has as yet to be specified. We want to send emails to the addresses in the email address column of our spreadsheet, so we specify that we want to create a new merge field called Email_Address and use it as a placeholder for the email addresses in our spreadsheet. In the next step we will match this placeholder as well as the placeholders in our document with the data we get from a CSV version of our spreadsheet.
Now that we have made our document template and have saved our delivery method, we need to pull the information from our Google Spreadsheet. The easiest way to do this is to simply download the spreadsheet as a CSV file.
Once we have downloaded our data as a CSV file, we can upload that to WebMerge.
Upload the data, then in our final two steps we map the merge fields to the columns of our spreadsheet and send our newly created documents off to our recipients.
Click Merge the Data!
Congrats! You just merged your Google Spreadsheet data with a document template and sent it to all the relevant recipients.
Want to do more with WebMerge? Check out all the ways you can streamline your documentation process today!
No comments:
Post a Comment